About FRP
FRP standard for fast reverse proxy, is an open-source, concise and easy-to-use, high-performance reverse proxy software, supporting TCP, UDP, HTTP, HTTPS and other protocols.Table of Contents
Requirement
- Must have a server with an Public IP address (e.g. VPC).
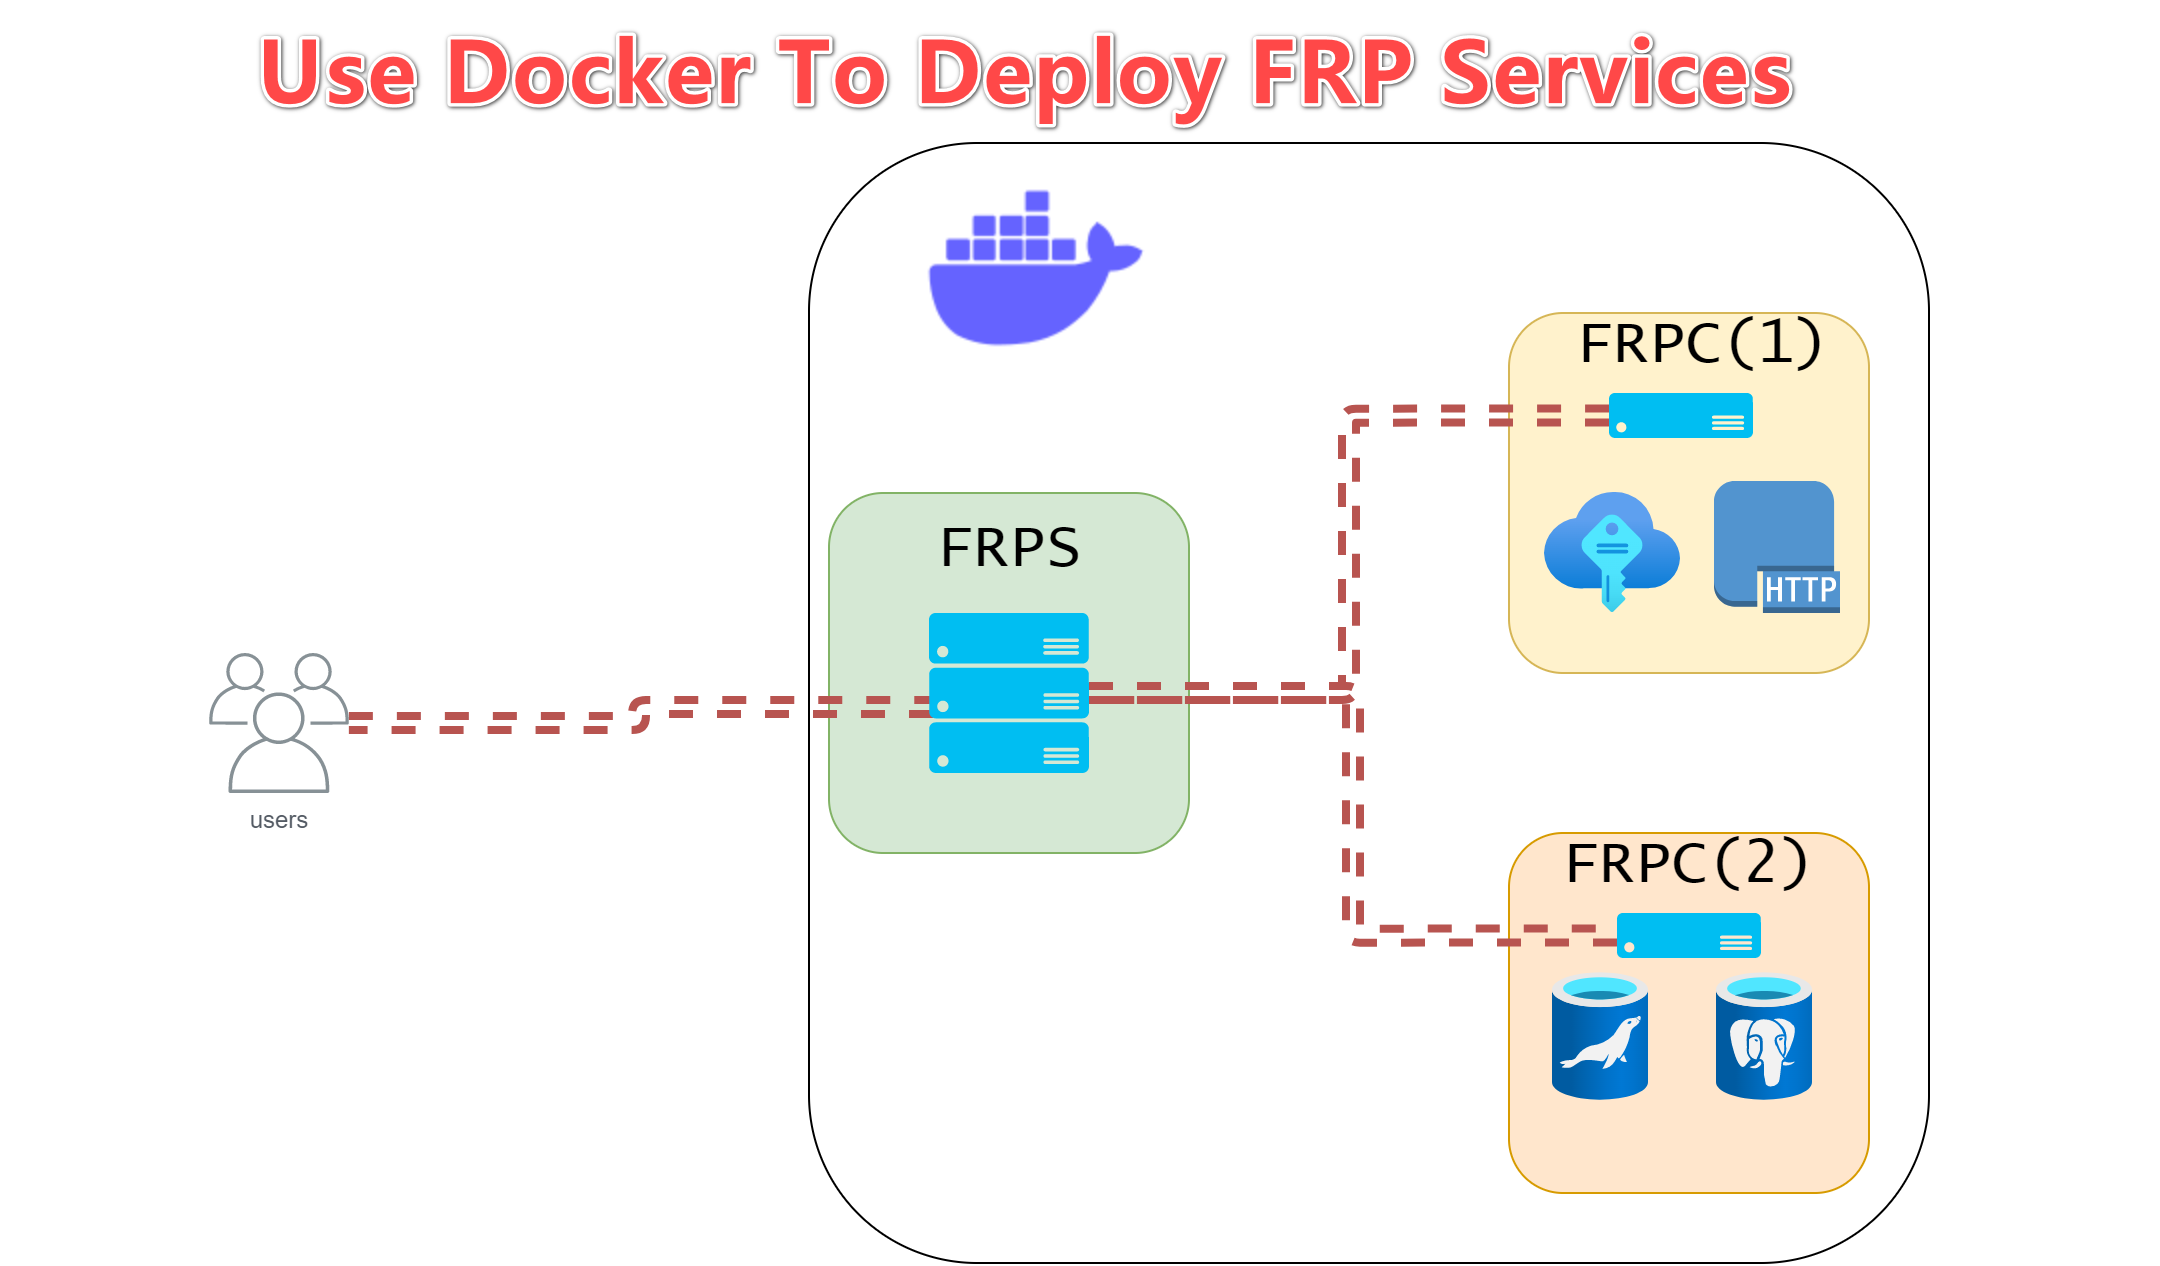
How it work

- The server runs, listens on a main port (default 7000), and waits for the client to connect;
- The client connects to the main port of the server, and tells the server the port and forwarding type to listen on.
- The server open new process session to listen on the specified port by the client;
- Users on the Internet connects to the specified port by the client, and the server forwards data to the client through the connection with the client.
- The client forwards the data to the local service, make the internal services expose to the Public Network.
Deploy FRP services
The configuration tutorial is mainly divided into two parts
- One is the configuration of the server (Internet)
- One is the configuration of the client (Intranet)
Server configuration
Create a frps.ini configuration file on Server
[common]
bind_addr = 0.0.0.0
bind_port = 7000
vhost_http_port = 80
vhost_https_port = 443
log_file = /tmp/frps.log
authentication_method = token
token = yM1nDMBFihB93zs376uR| Parameter | Description |
|---|---|
| bind_addr | 0.0.0.0 means listen on any IP address |
| bind_port | Default port 7000 is used to bind with the server |
| vhost_http_port | Virtual host HTTP port |
| vhost_https_port | Virtual host HTTPS port |
| log_file | /tmp/frps.log logFile path |
| authentication_method | Specifies authentication method (e.g. token) |
| token | Authentication token is yM1nDMBFihB93zs376uR |
Full configuration file for frps (Server)
Use Docker Compose to Build the frps service
version: '3'
services:
    frps:
        image: snowdreamtech/frps:latest
        container_name: frps
        network_mode: host
        restart: always
        volumes:
            - ./frps.ini:/etc/frp/frps.ini
            - ./tmp:/tmp:rw
After modification, the following tree structure is displayed
.
├── docker-compose.yml
├── frps.ini
└── tmp (folder)
Create and start frps container
docker-compose up -d| Parameter | Description |
|---|---|
| up | Create and start containers |
| --detach , -d | Detached mode: Run containers in the background |
Open ports in firewall (option)
Ubuntu Firewall:
sudo ufw allow 7000/tcpCentOS Firewall:
sudo firewall-cmd --permanent --add-port=7000/tcpClient configuration
Create a frpc.ini configuration file on Server
[common]
server_addr = 12.34.56.78
server_port = 7000
token = yM1nDMBFihB93zs376uR
[web01]
type = http
local_ip = 127.0.0.1
local_port = 80
custom_domains = web01.yourdomain.com| Parameter | Description |
|---|---|
| server_addr | 12.34.56.78 means the Public IP of frps |
| server_port | same as server bind_port |
| token | same as server authentication token |
| [web01] | Local service name |
| type | which type of service select (e.g. HTTP) |
| local_ip | 127.0.0.1 means localhost |
| local_port | Local service port (e.g. 80) |
| custom_domains | Complete domain name for user to access via Internet |
==For HTTP/HTTPS services, DNS management is required.==
Full configuration file for frpc (Client)
Use Docker Compose to Build the frpc service
version: '3'
services:
    frpc:
        image: snowdreamtech/frpc
        container_name: frpc
        network_mode: host
        restart: always
        volumes:
            - ./frpc.ini:/etc/frp/frpc.ini
After modification, the following tree structure is displayed
.
├── docker-compose.yml
├── frpc.ini
Create and start frpc container
docker-compose up -dVerify whether the container service is successfully started
docker-composeCheck the log output
docker-compose logs -f --tail="all"Conclusion:
Here it is, congratulations, you have basically succeeded. but frp have many functions and features let us discovery.e.g.
TCP connection,Forward DNS query requests,Forward Unix Domain Socket,Expose your service privately,P2P Mode, etc.
Reference:
- GitHub - fatedier/frp: A fast reverse proxy to help you expose a local server behind a NAT or firewall to the internet.
- snowdreamtech/frpc - Docker Image | Docker Hub
1


1


1


1


1


1


1


1


1


1


1


1


Amazing write ups, With thanks!
casino en ligne
Kudos. I enjoy it!
casino en ligne France
Reliable forum posts Thanks a lot.
casino en ligne fiable
With thanks, A lot of facts.
casino en ligne
Nicely put. Thanks!
casino en ligne France
You actually expressed this wonderfully.
casino en ligne
Perfectly voiced truly! !
casino en ligne francais
Many thanks, Quite a lot of content.
meilleur casino en ligne
Seriously tons of excellent knowledge.
casino en ligne
Seriously a good deal of superb knowledge!
meilleur casino en ligne
1


1


1


1


1


1


